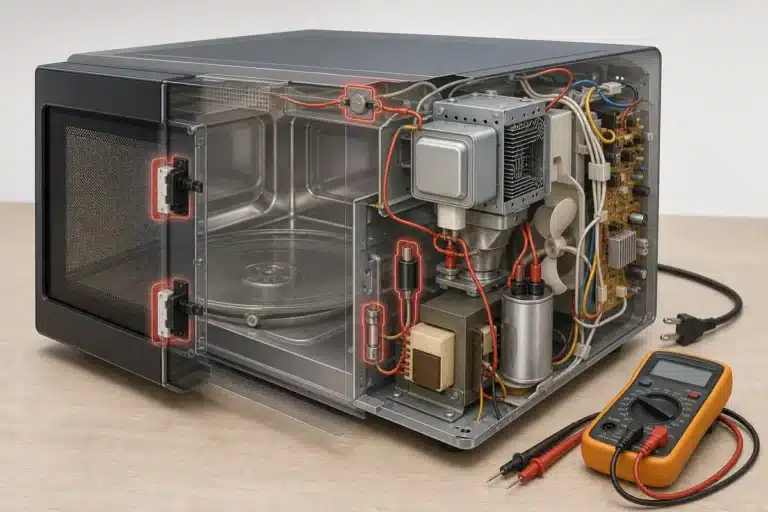
Kenmore Microwave Not Heating – Causes & Fixes
1. Blown Door Interlock Fuse (Most Common)
The ceramic fuse protects the microwave’s internal circuitry; a power surge or a hard door slam can blow it instantly, leaving the unit completely dead or running without heat.
- Unplug the microwave from the wall outlet.
- Remove the outer cabinet (typically 4–6 Phillips screws on the back and sides).
- Locate the ceramic fuse near the power cord or control board—it looks like a small glass or ceramic cylinder.
- Use a multimeter set to continuity mode and probe both fuse ends. No continuity = blown fuse.
- Replace with a fuse of the exact same amperage and voltage rating printed on the old fuse body.
- Reassemble, plug in, and run a test with a cup of water.
2. Faulty Door Interlock Switches
Microwaves have two or three door interlock switches that must all close properly for the magnetron to fire. A single defective switch prevents heating—and can also blow the main fuse.
- Unplug the microwave and remove the cabinet.
- Identify the door switches—they are mounted directly behind the door latch hooks on the front panel.
- Disconnect each switch’s wires, then test each switch with a multimeter on continuity mode: it should show continuity when pressed and none when released (for normally-open switches).
- Replace any switch that fails the test.
- If a blown fuse was also present, replace the fuse at the same time—a bad switch often causes the fuse to blow.
3. Defective High-Voltage Diode
The high-voltage diode converts AC power to DC for the magnetron; when it shorts or opens, the microwave runs—turntable spins, light works—but produces no heat and often makes a loud hum.
- Discharge the high-voltage capacitor before touching anything. Use a well-insulated screwdriver to short the capacitor terminals to the chassis, or use a discharge tool. Capacitors can hold a lethal charge even when unplugged.
- Locate the diode connected between the capacitor and the chassis ground (it looks like a small cylindrical component with two wire leads).
- Disconnect and test with a multimeter set to the diode or high-resistance range. A good diode shows continuity in one direction only; a shorted diode shows continuity both ways; an open diode shows none.
- Replace a failed diode with one matching the original’s ratings.
4. Failed High-Voltage Capacitor
A shorted or open capacitor will starve the magnetron of power, causing a kenmore microwave not heating symptom—often accompanied by a loud buzzing or humming noise during operation.
- Unplug the microwave and discharge the capacitor using the method described in Step 1 of the diode section above—this step is mandatory every time you work inside a microwave.
- Locate the large cylindrical capacitor in the high-voltage section of the chassis.
- Disconnect the capacitor leads and test with a multimeter set to capacitance mode. Compare the reading to the value printed on the capacitor label (usually 0.90–1.05 µF).
- Also check for a short: set the meter to resistance; a shorted capacitor reads near zero ohms.
- Replace a failed capacitor with one of the same capacitance (µF) and voltage (VAC) ratings.
5. Worn-Out Magnetron — Kenmore Microwave Not Heating at the Source
The magnetron is the component that actually generates microwave energy; when it burns out, the appliance may run perfectly in every other respect but produce zero heat.
- Unplug the microwave and discharge the capacitor (mandatory step—see above).
- Locate the magnetron—it is a large metal component attached directly to the waveguide cover inside the cavity.
- With a multimeter on resistance mode, test across the two magnetron filament terminals. You should read 0–3 ohms (very low resistance). A reading of OL (open) means the filament has burned out.
- Also test each terminal to the magnetron chassis; any reading other than OL here indicates a shorted magnetron.
- If defective, replace the magnetron. Note: Magnetron replacement cost often approaches the price of a new microwave—compare before proceeding.
6. Faulty Control Board or Inverter Board
On newer Kenmore models, a failed main control board or inverter board can prevent the high-voltage circuit from activating, resulting in a microwave that appears to work but generates no heat.
- Unplug the microwave and discharge the capacitor before opening the cabinet.
- Visually inspect the control board for obvious signs of failure: burnt spots, cracked solder joints, or bulging capacitors on the board surface.
- Check that all ribbon cable and wire harness connectors are firmly seated on the board.
- If your model has an inverter board (a separate secondary board near the high-voltage section), inspect it the same way.
- If damage is visible or all other components have tested good, consider replacing the defective board. Consult your model’s service manual on the official Kenmore support page for wiring diagrams before ordering.
Frequently asked questions
Is it worth repairing a Kenmore microwave that’s not heating?
It depends on the failed part and the microwave’s age. A blown fuse or bad door switch costs under $15 to fix and is almost always worth repairing. A new magnetron can cost $80–$150 plus labor, which may approach the price of a new mid-range microwave—compare the repair estimate to current replacement prices before committing.
Why does my Kenmore microwave run but not heat food?
When everything operates normally—turntable, light, timer—but there’s no heat, the fault is almost always inside the high-voltage circuit. The most likely culprits are the high-voltage diode, capacitor, or magnetron. A failed diode is the single most common cause of this exact symptom.
Can I safely test microwave components myself?
You can safely replace the door fuse and door switches if you keep the microwave unplugged and follow basic electrical precautions. However, the high-voltage capacitor stores a potentially lethal charge—it must be manually discharged every single time before you touch any internal component. If you are not comfortable doing this, hire a qualified appliance technician.
How do I discharge a microwave capacitor safely?
Unplug the microwave first. Then use a well-insulated discharge tool or hold an insulated-handle screwdriver by the rubber grip only and briefly touch the metal shaft across both capacitor terminals simultaneously, then from each terminal to the chassis. Repeat two or three times to ensure a full discharge. Never skip this step—capacitors can hold a 2,100-volt charge long after the unit is unplugged.