Electric Oven Not Heating Up: Causes & Fixes
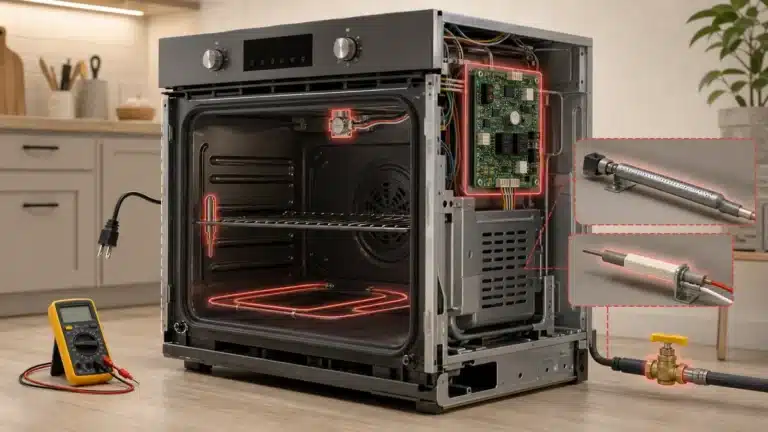
1. Burnt-Out Bake Element
The bake element sits at the bottom of the oven cavity and is the most common reason an electric oven stops heating. It can burn through visibly, leaving a crack, blister, or hole in the coil.
- Unplug the oven or switch off its circuit breaker before you begin.
- Open the oven door and visually inspect the bottom element for visible damage—cracks, burn marks, or a break in the coil.
- Set a multimeter to the resistance (Ω) setting and touch the probes to each terminal of the element. A healthy element reads roughly 20–50 Ω; an open circuit (OL/infinite) means it has failed.
- If faulty, remove the two mounting screws securing the element to the back wall, gently pull the element forward, and disconnect the two wire terminals.
- Install the new element by reversing these steps, restore power, and test with a 350 °F (175 °C) bake cycle.
2. Burnt-Out Broil Element
If the oven won’t reach temperature or takes much longer than normal, the upper broil element may also be at fault—many ovens use both elements together during baking. Like the bake element, it can visibly burn through.
- Unplug or switch off the breaker.
- Inspect the upper element near the top of the oven cavity for cracks, holes, or burn marks.
- Test continuity with a multimeter as described above; no continuity means replacement is needed.
- Remove the mounting screws, disconnect the wire terminals, and fit the new element.
- Restore power and run a full bake cycle to confirm the repair.
3. Blown Thermal Fuse — a Top Cause of an Electric Oven Not Heating Up
The thermal fuse is a one-time safety device that permanently opens (blows) if the oven overheats, cutting power to the heating circuit. Once blown, it must be replaced—it cannot be reset.
- Disconnect power to the oven.
- Remove the rear access panel (usually 4–6 screws) or the oven bottom panel, depending on your model, to locate the thermal fuse—a small cylindrical or flat component on the back wall or control area.
- Disconnect the two wires and test continuity with a multimeter. A good fuse reads near 0 Ω; no continuity means it has blown.
- Note the temperature rating printed on the fuse body and purchase an identical replacement.
- Install the new fuse, reconnect the wires, reassemble the panel, restore power, and test the oven.
- Important: If the fuse blows again shortly after replacement, investigate the root cause (blocked vents, faulty thermostat) before continuing to use the oven.
4. Faulty Oven Temperature Sensor (RTD Probe)
The temperature sensor monitors the internal oven temperature and sends a resistance signal to the control board. If it drifts out of spec or fails completely, the oven may not heat at all or may display an error code.
- Switch off power to the oven.
- Locate the temperature sensor probe—a thin metal rod protruding from the upper back wall inside the oven cavity.
- Disconnect the sensor from its wiring harness and test resistance at room temperature (approximately 68 °F / 20 °C). Most sensors read around 1,080–1,100 Ω at room temperature; consult your model’s service data for exact values.
- If the reading is far outside range or shows an open circuit, replace the sensor.
- Remove the one or two mounting screws, pull the sensor through, connect the new sensor, resecure it, restore power, and run a test cycle.
5. Tripped or Weak Circuit Breaker
Electric ovens typically run on a dedicated 240 V double-pole circuit breaker. A breaker that has partially tripped or become weak can cut power to the heating elements while still allowing the clock and lights to function, making the fault easy to miss.
- Go to your home’s electrical panel and locate the breaker labeled for the oven or range.
- If the breaker is in the middle (tripped) position, push it firmly to the full OFF position first, then flip it back to ON.
- Return to the oven and test a 350 °F bake cycle. If the oven now heats, the breaker tripped due to a momentary surge.
- If the breaker trips again immediately or repeatedly, do not continue to reset it—there is likely a short circuit in the oven’s wiring or elements that must be repaired first.
- Use a non-contact voltage tester at the outlet or terminal block to verify that both legs of the 240 V supply are present. If one leg is missing despite the breaker appearing ON, the breaker itself may need replacement by a licensed electrician.
6. Failed Electronic Control Board
The electronic control board (also called the clock/control or ERC) governs when and how long the elements receive power. A failed relay on the board can prevent elements from energizing even when all other components test good.
- Before suspecting the board, confirm that both elements, the thermal fuse, and the temperature sensor all test good—the control board should be a last resort.
- Disconnect power, then access the board by removing the rear control panel or the control console, depending on your oven’s design.
- Visually inspect the board for burnt spots, scorched relay contacts, or cracked solder joints.
- If damage is visible, or if all other components have tested good and the oven still won’t heat, replace the control board.
- Take a clear photo of all wiring connections before disconnecting anything, then swap the board and reconnect exactly as photographed.
- Restore power and run a full bake cycle to verify.
For additional guidance on component testing and wiring diagrams, visit the Appliance Repair Lesson resource library for free service literature and technical tips.
Frequently asked questions
Why does my oven light and clock work but the oven still won’t heat?
The clock, display, and interior light run on 120 V, while the heating elements require the full 240 V supply. If one leg of the 240 V circuit is lost—due to a partially tripped breaker, a loose terminal, or a blown thermal fuse—the low-voltage accessories keep working but the elements receive no power. Check your breaker first, then the thermal fuse.
How do I know if my bake element or broil element has failed?
The quickest method is a visual check: look for cracks, blisters, burn holes, or bright arcing spots on the element coil. Confirm the diagnosis with a multimeter continuity test—a healthy element shows continuity (roughly 20–50 Ω), while a failed element shows no continuity at all (open circuit).
Is it safe to replace oven elements myself?
Yes, for most homeowners. Bake and broil elements are among the most DIY-friendly oven repairs because they are accessible without dismantling the oven and only require a screwdriver and a multimeter. Always disconnect power at the breaker or wall outlet before touching any components, and never work inside the oven while it is plugged in.
How much does it typically cost to repair an electric oven not heating up?
A replacement bake or broil element typically costs $20–$60 for the part alone, making it one of the most affordable oven repairs. A thermal fuse is usually under $15. A temperature sensor runs $15–$40, and a control board can range from $80–$250 or more depending on complexity. Professional labor generally adds $75–$150 per hour on top of parts costs.